
Thanks to James Wages for the challenge, and Paul Dunning and Dan Jasker for the additional ideas. Please also note that this is nothing I dreamed up — CSS Sprites are the brain-child of Dave Shea and others. You can read more about this technique at A List Apart.
It turns out that this technique can be applied in Freeway, but it does take a fair amount of work (and in my case, a couple of Actions). At the moment, there's no way to automate this process, but once you've slogged through it on a few pages, you can turn those pages into Master Pages to keep you from going crazy or developing RSI.
Try out the navigation on this mini-site. Rollovers are so fast that they appear a little harsh! (More subtle colors would help that effect, visually.) The reason why is that the image doesn't have to be loaded or swapped — it's always there, just moving around to show a different part of itself. The big rainbow bar on this page is the whole thing. It seems counter-intuitive that you could put a huge graphic like that into the background of every link area on the top bar, and that would be faster than a pair of tiny images, but it's true. The resulting page will load faster, and the effect will animate faster than any JavaScript method there is.
So we've established that this is cool, and it works really well. But how to do it in Freeway? Surprisingly difficult. Making the pieces is easy. In fact, let's do that first so you can get a sense of accomplishment.
To make the merged background graphic
- CSS Layout button On.
- Draw a graphic box the size of your final graphic on the pasteboard above the page. Mine is 600px × 80px, because I have 5 × 4 options that are each 120px × 20px. Name this something memorable, like 'background'. Apply the TemplateHelper Action to it. (You do not need to check "Make Partial".)
- Draw another graphic box as a child of the first graphic. Use the Inspector to place it at 0,0 (top left) and make it 120px × 20px.
- Double-click into this box to get a text cursor, enter your text, and use the text style options to position it, style it, set a background color, etc. This will be your initial state, so set everything the way you want it to appear in all the options. (It's a good idea to try out your longest caption here to make sure it fits.)
- Use Item / Duplicate to make horizontal offset copies of this element (horizontal offset 120px). Change the text in each copy until you have all of your options in a row across the top of your background.
- Click and shift-click to select the entire row of options. Then use Item / Duplicate again, this time offset vertically 20px to make all four options.
- Change the background color, text color, any other options you like, for each option. Mine is a simple background-color change.
To make the navigation bar HTML
- Draw an HTML box 120px × 20px. Name it 'home'. In the Inspector, set the Overflow property to hidden.
- Double-click into the box and type home, and create a link to your home page on that text. Do not style this text in any way — leave it all default.
- Use Item / Duplicate to make the other elements of your navigation, rename each one, change the text and the links within.
- You may group these elements if you like to make it easier to move them around. Position the navbar where you like. Copy and paste it onto your other four pages.
- Move to your home page, and select the text inside the home HTML box. Open the Hyperlink dialog, and press the Extended button. Press New, then add 'class' (without the quotes) in the Name field and 'here' in the Value field. Okay out of the stack of dialogs.
- Repeat the previous step for each of the four other pages, only changing the respective option for each page. When you're done, each page will know when it is "here".
To make the CSS that wires this together
First, try doing all this in Freeway. It's just barely possible, but it makes me want to scream. So break out your weapon of choice (I like CSSEdit for this) and start hand-coding or widget-clicking/menu-pulling as you prefer. Here's what I ended up with: test.css
- Make your base 'a' style for the first option. You will need to name the selector '#home a' and you will need to set the following attributes:
- height: 20px
- display: block
- background-image: url("background.gif")
- background-repeat: no-repeat
- background-position: 0 0
- text-indent: -300px
- I wanted to use the same attributes for the 'visited' state, so I changed the name of the selector to include that: '#home a, #home a:visited'
- Now the other states of the link are hover and active, and you have to create them in that order. Note that the only difference between these is the background-position. Everything else is inherited. The background-position for each is the negative X/Y position of the slice you want to have appear. For the home option, hover is at 0 -20px and active is at 0 -40px.
- To show the currently-selected option, we create a style with the classname 'here': '#home a.here'
- Each option gets its own duplicate set of these styles, offset by 120 pixels left.
- Save this stylesheet, and use the External Style Sheets Action to apply it to your pages. (You will need to apply this stylesheet to any page that includes your navigation bar.) Be sure to set the Action like this.
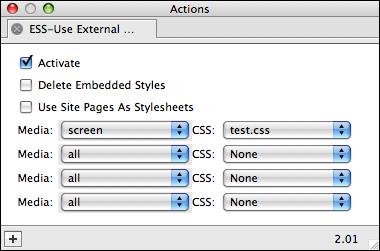
Setting Media to screen means that the navigation will print correctly (background images normally are invisible when you print). If you don't care about that, set Media to all. - Preview, and see if your navigation appears as you designed it.
Now that you have everything set up correctly, you can turn each of these pages into a Master Page. That way you can make lots of pages in each section without having to adjust the 'here' setting on each one. Make sure when you do this that you end up with the background image appearing only once in your entire document. Put it by itself on a single page somewhere. Freeway has some amusing ideas about naming images that run counter to this sort of magic trick, and if there's more than one instance of this image, you may find that the only one that gets created is named 'backgroundaaa23.gif.